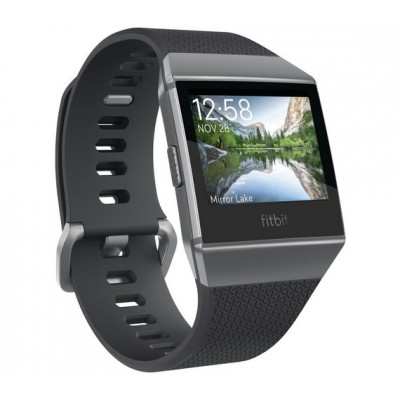
FITBIT IONIC SMARTWATCH CHARCOAL GREY
750/2800

Product details
- Brand: Fitbit
- Catalogue number: 750/2800
- Manufacturer's number: FB503GYBK-EU
Fitbit support
 UK:
UK:
 Eire:
Eire:
Email me this page
Enter your email address to have this page emailed to you *
FAQs
To explore the compatibility of your device, please click here. On this page, you will be able to select your device type & view all of the available features within the Fitbit app.
Ionic has two detachable bands (top and bottom) that you can replace with accessory bands sold separately. To remove and replace a band:
- Turn Ionic over and find the band latches—there’s one on each end where the band meets the frame.
- To release the latch, press down on the flat metal button on the strap.
- Gently pull the band away from the watch to release it.
- Repeat on the other side. If you have trouble removing the band or if it feels stuck, gently move the band back and forth to release it.
- To attach a wristband, press it into the end of the watch until you feel it snap into place. The band with the clasp attaches to the top of the watch.
In addition to completing only a handful of laps or stopping to rest often, inconsistencies in your swim data may be caused by any of the following:
- Stopping to rest midway across the pool
- Resting for longer than 60 seconds after completing a pool length
- Changing stroke type midway across the pool
- Swimming with a kickboard or not using your hands
- Swimming less than the minimum duration set to be auto-recognized
- The units for the pool length setting don't match the units you use for your Fitbit settings. For example if you measure length in feet and inches, and specify a pool length in meters. For more information, see How do I update my Fitbit settings?
Your tracker is water-resistant up to 50 meters.
You’re prompted to connect your watch to a Wi-Fi network during setup. If you skipped this step or want to add other networks to your watch, complete these steps:
- From the Fitbit app dashboard, tap or click the Account icon (
) > your watch tile.
- Tap or click Wi-Fi Settings.
- Tap or click Add Network and follow the on-screen instructions to connect your watch.
After you add a Wi-Fi network, your watch automatically downloads new music or apps when it’s plugged into the charger and in range of the network.
The Fitbit Ionic battery can last up to 5 days. Because battery life is affected by use and other settings, actual results may vary.
Consider these tips when you want to conserve battery life:
- Make sure you're charging Ionic fully each time. It can take up to 2 hours to charge your watch. For instructions, see How do I charge my Fitbit device?
- Turn off the option to wake the screen when you turn your wrist; instead, tap the screen to turn it on:
- On your watch, press and hold the back button, then swipe to the quick settings screen >Screen Wake > Manual.
- If you don't need heart rate data, change the Heart Rate setting to Off. Note that the green LED continues to flash even if Heart Rate is turned off.
- Turn off call, text, calendar, and app notifications if you know you're going to receive many hundreds of notifications. A large volume reduces battery life:
- On your watch, press and hold the back button, then swipe to the quick settings screen >Notifications > Off.
- Charge your watch more often if:
- You play music or use the music controls frequently
- You use apps that keep the watch's screen on, use GPS, or frequently access the internet
- You use an interactive or animated clock face
- Don't receive reminders to move every hour. To get fewer reminders, make sure you walk 250 steps each hour, change the number of hours you want your stationary time monitored, or turn off the feature on days you don't need it.
- If you have many silent alarms set, consider deleting some. Each alarm you add up to the maximum of 8 reduces battery life by a small percentage.
- Shut down Ionic when it's not in use. For instructions, see How do I turn off my Fitbit device?
|
If you can’t hear sounds on your phone, check the following:
- Check that the volume is turned up.
- Check that silent mode has not been available.
- Inspect the speakers for any visible debris that may be blocking the sound. Remove with a soft brush if necessary.
- Reboot the phone by turning off and on. Alternatively, press and hold the Power and Volume Up button for 15 seconds.
- If the sound issue only occurs on a specific app, check for any app updates.
- Check your phone for any software updates. If available, update the software.
- If your phone has Do Not Disturb mode, try turning this off. This mode silences sounds and notifications.
- If you are using headphones, check that the headphones are secure in the phone. If necessary, try another pair of headphones to determine if the headphones are not producing sound rather than the phone.
- Check if your phone is connected to another Bluetooth device and disconnect if necessary for the sound to come out of the phone direct.
- Perform a Factory Reset. Please note, this will erase all data and settings from your phone.
Click here to read our full article on what to do if you can't hear sounds on your phone.
If you can’t send text messages from your phone, check the following:
- Check that you have sufficient signal by looking at the signal strength.
- Visit your network provider’s website to check if there are any disruptions in your area.
- Check that the Short Message Centre (SMSC) number is correct in your phone. Contact your network provider to get the correct number.
- If using a specific messaging app such as WhatsApp or Facebook Messenger, check for any updates or any software settings.
- Ensure your phone has not run out of storage. If it is full, it will hinder the ability to send messages.
- Check that the Access Point Name (APN) settings are correct. Contact your network provider to get the correct settings.
- Reboot the phone by turning off and on. Alternatively, press and hold the Power and Volume Up button for 15 seconds.
- Try the SIM card in another phone to check if it is an issue with the SIM itself.
If the issue remains, we recommend contacting your network provider for further support.
If you can’t make calls, but you can receive them, check the following:
- Check that you have sufficient signal by looking at the signal strength.
- Visit your network provider’s website to check if there are any disruptions in your area.
- Check that you have not accidentally activated call restrictions such as call-blocking.
- If you have a prepaid SIM, check that you have sufficient balance and top up if necessary.
- If you are in an area where you should be roaming, check that your roaming settings are enabled.
- If you use Voice over LTE (VoLTE) check that this is turned on.
- Check that your network settings are up to date. Contact your network provider for the latest settings.
- Try the SIM card in another phone to check if it is an issue with the SIM itself.
- Reboot the phone by turning off and on. Alternatively, press and hold the Power and Volume Up button for 15 seconds.
If the issue remains, we recommend contacting your network provider for further support.
If your mobile data isn’t working, check the following:
- Check that you have sufficient signal by looking at the signal strength.
- Visit your network provider’s website to check if there are any disruptions in your area.
- Check that mobile data is turned on.
- If you are roaming, ensure that you your roaming settings are correctly configured.
- Check that the Access Point Name (APN) settings are correct on your phone.
- If you have set a data usage limit on your SIM or phone, check to see if this has been reached.
- Try the SIM card in another phone to check if it is an issue with the SIM itself.
- Reboot the phone by turning off and on. Alternatively, press and hold the Power and Volume Up button for 15 seconds.
If the issue remains, we recommend contacting your network provider for further support.
Questions & answers
How-to videos
-
How to pair to bluetooth devices
-
How to personalise notifications
-
How to customise your apps
-
How to personalise your clock face
-
How to add personal music
-
How to add Pandora stations
-
How to add payment cards
-
How to switch accessory bands
-
How To Set Up A Tracker On A Computer
-
How To Set Up A Tracker On A Mobile Device
Returns policy
If you need advice or support for your product, please in the first instance contact the support provider using the number on this support page.
If you still need to return your product then please visit our most up to date returns policy here.


